WordPress themes, plugins, and core PHP files power WordPress websites. Unless you edit the files or use an incompatible version of PHP, PHP problems are unlikely to be caused by the core. WordPress files. However, installed plugins and themes that conflict with WordPress may create difficulties.
It is your responsibility to identify and fix issues when they do occur. Fortunately, WordPress users can access debugging options that significantly simplify this procedure.
In this article, we will discuss “How to Enable or Disable Debug Mode in WordPress”
Explaining WordPress Debugging:
WordPress has many PHP constants but a popular one is WP_DEBUG which you may use to enable “Debug” mode on your entire website. It may be activated by adding a single line to the wp-config.php configuration file, as it is by default disabled.
PHP normally only logs and displays fatal PHP errors on your page; however, you may use Debug mode to log and display all PHP errors, notifications, and warnings. This may include alerts on violations of suggested PHP conventions.
Additionally, debug mode displays any deprecated arguments and methods your WordPress website utilizes. Further PHP constants, such as SAVEQUERIES and SCRIPT_DEBUG, can also be used to examine issues with websites.
How to Enable WordPress Debug Mode:
There are two methods to Enable the WordPress Debugging.
- Enabling Debug mode via wp-config.php.
- Enabling Debug mode via plugins.
You can also disable the WordPress Debug mode through these Methods.
1) Enabling Debug mode via wp-config.php:
Two methods can be used to access the wp-config.php file. You can log in to your Cpanel dashboard or use FTP. You can also install the WP File Manager plugin directly in WordPress. This will help you to change things directly on-site without going anywhere else.
You can locate the wp-config.php file by going to File Manager in Your Cpanel and then in this directory public_html > wordpress_directory > wp-config.php.
The worpdress_directory is the name of your directory where WordPress is installed.
Similarly, you can locate the wp-config.php file in the WP File Manager plugin.
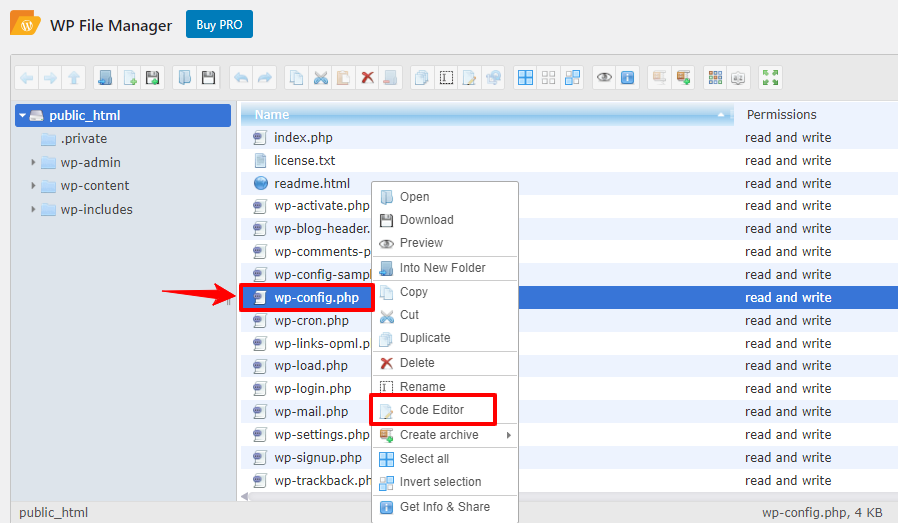
Right-click on the file, click on Code Editor, and then locate this line of code there:
define('WP_DEBUG', false);
Replace it with this code:
// Enable Debugging for WordPress
define('WP_DEBUG', true);

// Enable saving debugging details to a log file
define('WP_DEBUG_LOG', true);
You can also reverse the procedure if want to disable the debugging process like that:
Replace it:
// Enable Debugging for WordPress
define('WP_DEBUG', true);

// Enable saving debugging details to a log file
define('WP_DEBUG_LOG', true);
With this:
//Disable Debugging for WordPress
define('WP_DEBUG', false);
Save the changes and then exit the file. Debugging will be enabled.
2) Enabling Debug mode via plugins:
Go to your site Dashboard > plugins and then install the WP Debugging plugin. After installing the plugin go to Tools > WP Debugging.
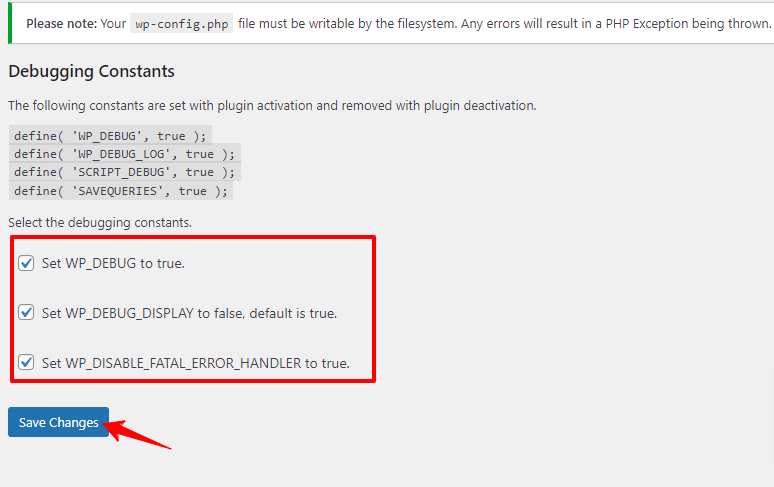
Check all the checkboxes and then save the Changes, Debugging will be Enabled. If you want to Disable the Debugging then uncheck all the checkboxes.
Conclusion:
“How to Enable or Disable Debug Mode in WordPress” is clarified in the above words. Wp_Debug is a wonderful PHP constant that allows you to Enable or Disable Debugging. With its help, you can debug your site comfortably.